Introduction to Tulle Skirts
Tulle skirts are a joyful expression of style and creativity. These skirts, known for their flouncy, whimsical nature, have grown in popularity across fashion circles. They provide a playful touch to any outfit, embodying both elegance and fun. Whether for a fancy event, a costume party, or just daily wear, tulle skirts can fit a wide range of occasions.
The beauty of tulle skirts lies in their versatility and the simple joy they can bring. People of all ages adore them. Little ones love twirling in them, while adults appreciate their ethereal charm. These skirts are not just beautiful; they are also a project that you can DIY with ease.
The process of creating your own tulle skirt is straightforward and satisfying. It involves a few essential materials and several simple steps. Even if you’re new to DIY projects, learning how to make a tulle skirt is an excellent starting point.
By crafting your own, you get to personalize the colors, length, and fullness, resulting in a unique piece that’s all your own. In this guide, we’ll walk you through each step needed to make a tulle skirt that you’ll be proud to flaunt. Let’s dive into the enchanting world of tulle skirts and learn how to make one from scratch.
Essential Materials for Your Tulle Skirt
To start your journey in creating a whimsical tulle skirt, gathering the right materials is key. This DIY project is simple, but it requires specific items to ensure success. Here is a list of the essential materials you will need:
- Tulle Fabric: Choose your favorite colors to bring your personal style to life. You’ll need several yards, depending on the desired fullness of your skirt. For a standard length skirt, plan on at least 10 yards.
- Waistband Material: This can be a long piece of ribbon or elastic. Select a length that wraps comfortably around your waist with some extra for tying or sewing.
- Scissors: A sharp pair is crucial for cutting the tulle into strips without fraying.
- Measuring Tape: To accurately measure the length of your tulle and ensure a consistent skirt length.
- Tape or Clamps: These will help secure the waistband material while you attach the tulle.
With these materials on hand, you’re well on your way to crafting a charming tulle skirt. Each material plays a role in the skirt’s creation, providing structure, color, and the delightful fluffiness inherent to a tulle skirt’s design. Ensure quality for a result that is as durable as it is beautiful. Remember to keep your measurements in mind when purchasing your materials to avoid any mid-project shortages.
In the following sections, we’ll dive into the process of choosing the right measurements for your skirt, preparing your waistband, attaching the tulle, and adding final touches for the perfect fluffiness. Get ready to create something that you’ll be excited to twirl in!
Measuring the Perfect Length for Your Skirt
To make a tulle skirt that fits just right, measuring is crucial. First, decide how long you want your skirt to be. Consider the occasion or your personal style when choosing the length. Some prefer short and playful, others like a longer, more elegant look.
Here are the steps to measure the perfect length:
- Choose the Length: Stand straight and measure from your waist to the point where you want the skirt to end. Add an inch for a seam allowance if you’re sewing the waistband.
- Double the Length: Once you have your desired length, double it. This ensures that when you fold the tulle strips over the waistband, they reach the right spot.
- Cut the Tulle: Use sharp scissors to cut the tulle fabric to the doubled length. Make sure all strips are the same size for a uniform look.
Pro tip: Consider using a cutting mat and rotary cutter for precise cuts. Check each piece after cutting to ensure consistency. You can always trim excess later for an even hemline.
Getting the length right is key to how your tulle skirt will look and feel when you wear it. So take your time, measure twice, and cut once to ensure perfection. In the next section, we’ll dive into preparing the waistband—the foundation of your skirt.
Preparing the Ribbon or Elastic Waistband
Before you start attaching the tulle to create the body of your skirt, the waistband needs to be ready. Choosing the right material for the waistband is vital for both the looks and functionality of your skirt.
Here’s how you can prepare your waistband:
- Measure Your Waist: Use a measuring tape to take your waist measurement. Ensure it’s snug but comfortable.
- Add Extra Length: If you’re using ribbon, add an extra 12-24 inches to tie a bow. For elastic, add an extra inch for overlap if sewing.
- Cut the Material: Cut your ribbon or elastic according to the measurement plus the extra length. Use sharp scissors to avoid fraying (ribbon) or stretching (elastic).
- Secure the Waistband: If using ribbon, you may tape the ends down as you work. With elastic, it’s recommended to sew the ends together to form a circle before beginning the tulle attachment process.
These steps are important to ensure that your skirt fits well and stays in place as you move. A well-sized waistband will also make attaching the tulle much easier and more manageable. In the next section, we’ll discuss how to attach your tulle to this waistband effectively.
Attaching Tulle to the Waistband
Now that your waistband is ready, it’s time to attach the tulle. The process of adding tulle to the waistband transforms your materials into a beautiful skirt. Here’s a clear, step-by-step guide to help you through:
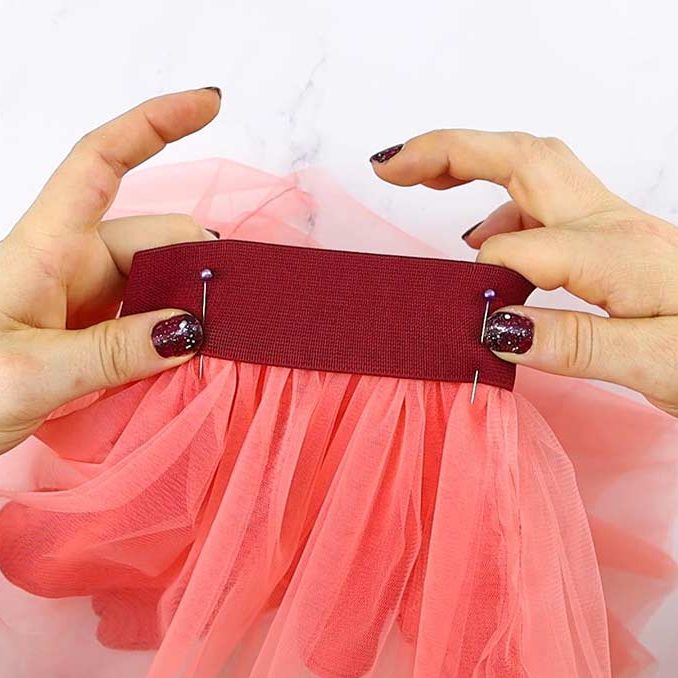
- Prepare Your Workspace: Clear a large flat surface and securely tape or clamp the waistband in place. This keeps it from moving as you work.
- Fold the Tulle: Take a strip of cut tulle, fold it in half to find the midpoint. The fold creates a loop at one end.
- Attach the Tulle: Place the loop under the waistband. Pull the loose ends over the waistband and through the loop. Gently tighten to form a knot.
- Repeat the Process: Continue this loop and pull method, attaching each tulle strip evenly along the waistband.
- Maintain Even Spacing: Ensure each tulle piece is tight enough to stay in place but loose enough to maintain fluffiness. Even spacing is essential for a uniform look.
- Check the Fullness: Periodically step back and review your work. Add more tulle strips if you want a fuller skirt.
Following these steps, you’ll see your tulle skirt take shape, one piece at a time. This method, known as the ‘no-sew’ technique, is popular due to its simplicity. Remember to handle the tulle gently throughout the process. This helps prevent wrinkles and maintains the tulle’s light, airy quality. Soon, you’ll have a gorgeous tulle skirt ready for the final touches!
Creating a Color Pattern with Tulle
Choosing colors for your tulle skirt is like adding your personal signature to the design. A color pattern can transform a simple skirt into a piece that truly stands out. Here’s how to create a beautiful color pattern with your tulle:
- Pick Your Color Scheme: Think about the look you want. Maybe you need soft pastels for a fairy-like effect, or bold colors for a statement piece. Gather tulle in these shades for your project.
- Plan Your Pattern: Before you start, lay out your tulle strips in the order you’ll attach them to the waistband. This step saves time and helps you visualize the final look.
- Start Simple: If you’re new to making tulle skirts, begin with a simple pattern. An alternating two-color scheme is an easy yet striking choice.
- Add Variation: For more depth, mix different shades of the same color. Or, use different textures of tulle for an eclectic look.
- Balance Your Design: Distribute colors evenly for symmetry, or intentionally create an ombre effect by gradually changing shades.
- Ensure Consistency: As you attach the tulle, check that your pattern stays consistent. Double-check color placement after every few knots.
Remember, your skirt should reflect your style, so feel free to experiment with unique patterns and color combinations. Enjoy the creative process and watch as your tulle skirt comes to life with a pop of color!
Final Touches and Skirt Fluffiness
Once all your tulle is attached, it’s time for the final touches. These will ensure your skirt is as fluffy and fabulous as possible. Here are some tips to add the perfect fluffiness to your tulle skirt:
- Fluff it Up: Gently run your fingers through the layers of tulle. Separate any pieces that are sticking together to maximize the skirt’s volume.
- Trim for Symmetry: Check for any uneven lengths. Use scissors to trim the ends of the tulle for a clean, symmetrical look.
- Inspect the Waistband: Double-check that the ribbon or elastic is secure. Make any necessary adjustments to ensure the skirt fits comfortably.
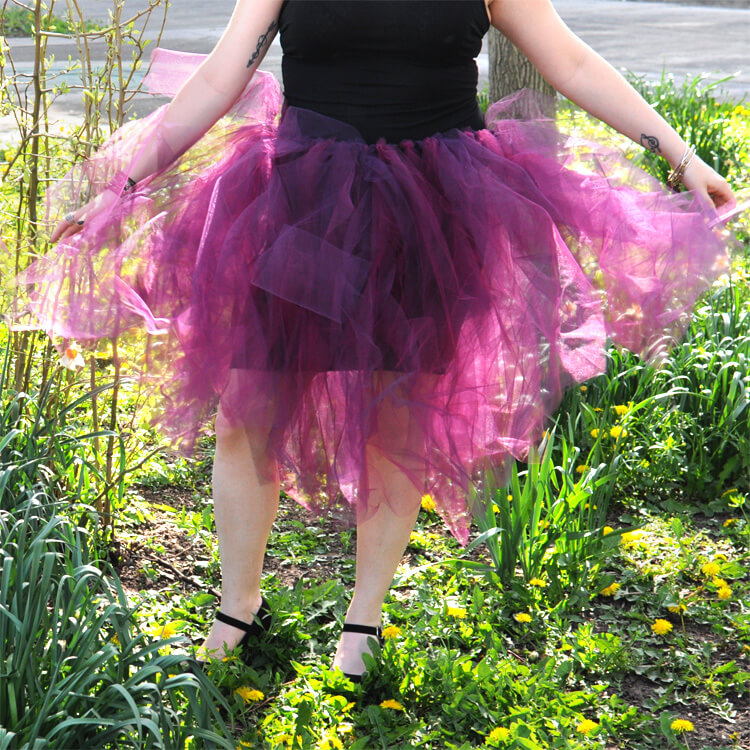
- The Final Look: Put on your skirt and look in the mirror. Move around to see how it flows. Make final adjustments as needed to achieve the desired look.
Remember to handle the tulle gently while fluffing. This helps maintain the soft, airy quality of the fabric. With these final steps, your handmade tulle skirt is ready to make its debut. Whether you’re dancing the night away or simply enjoying the swish of your new creation, you’ll love the finished product. Enjoy the satisfaction of having crafted a gorgeous garment with your own two hands!
Styling Your Handmade Tulle Skirt
Once your tulle skirt is complete, it’s time to think about styling. How you wear your skirt can change the look entirely. Whether dressing up for a special event or adding a fun touch to everyday wear, here are some tips to style your handmade tulle skirt:
- Choose the Right Top: Pairing with a fitted top balances the skirt’s volume. Try a sleek tank top or a form-fitting blouse. For cooler weather, a snug sweater works well.
- Pick Proper Footwear: Shoes can make a big difference. High heels elevate the outfit, while flats offer a more casual vibe. Play around with different styles to find the best match.
- Add Layers: For more depth, layer a jacket or cardigan over your top. This can also add warmth without hiding the skirt.
- Accessorize: A statement necklace or a simple belt can accentuate your waist. Accessories add personality to your outfit.
- Confidence is Key: Wear your tulle skirt with pride. Stand tall, and let your unique creation shine. Confidence makes any outfit look better.
With these styling tips, enjoy the versatility of your tulle skirt. Mix and match with different items in your wardrobe to create endless looks. Your skirt is not just a piece of clothing, but a reflection of your creativity and style.